How To Install Plex Media Server on CentOS
We show you how to install and configure Plex Media in Linux CentOS.
As users of any operating system we, always handle large amounts of information , files, audio, images, videos and more, and it is ideal and practical to know how to organize each of them in a useful way to access them faster and therefore have better control over them.
In this element management category, we have a utility called Plex.
Now, let's see how to configure Plex in CentOS in its free version.
Step 1: Add Plex Repository in CentOS
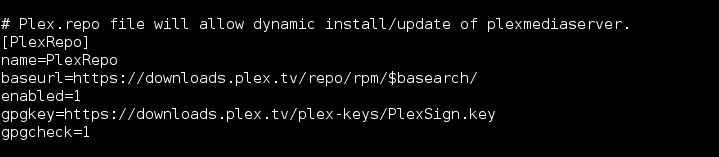
The first step is to add the Plex repository in CentOS, for this, we will go to the yum.repos.dy directory and create a new repo file called “plex.repo” using the nano editor like this:
cd /etc/yum.repos.d/
nano plex.repo
In the new file we will paste the following:
# Plex.repo file will allow dynamic install/update of plexmediaserver.
[PlexRepo]
name=PlexRepo
baseurl=https://downloads.plex.tv/repo/rpm/$basearch/
enabled=1
gpgkey=https://downloads.plex.tv/plex-keys/PlexSign.key
gpgcheck=1
 We save the changes using the following key combination Ctrl + O and exit the editor using this combination Ctrl + X
Step 2: Install Plex in CentOS
To install Plex on CentOS, we will execute the following line:
yum -y install plexmediaserver
After installing, we will run the following:
systemctl start plexmediaserver
systemctl enable plexmediaserver
To check the status of Plex, let's execute the following. We can see that his state is active.
systemctl status plexmediaserver
Step 3: Configure Rules in Firewalld for Plex
The next point is vital since we must configure the CentOS firewall to allow access through the browser to Plex, for this, we will install Firewalld by executing the following:
yum -y install firewalld
There we expect the entire installation process to finish, and after that, we will enable the Firewalld service and enable it in the CentOS boot:
systemctl start firewalld
systemctl enable firewalld
Now, we are going to add a new Firewalld configuration for the Plex installation.
Important you know that the Plex media server needs a port in the ‘LISTEN' state, so we are going to create a new Firewalld XML configuration. We will go to the / etc / firewalld / service directory, and there we will create a new configuration of the firewalld plex.xml service using nano if:
cd /etc/firewalld/services/
nano plexmediaserver.xml
In the new file pasted the following:
<?xml version="1.0" encoding="utf-8"?>
<service>
  <short>plexmediaserver</short>
  <description>Ports required by plexmediaserver.</description>
  <port protocol="tcp" port="32400"></port>
  <port protocol="udp" port="1900"></port>
  <port protocol="tcp" port="3005"></port>
  <port protocol="udp" port="5353"></port>
  <port protocol="tcp" port="8324"></port>
  <port protocol="udp" port="32410"></port>
  <port protocol="udp" port="32412"></port>
  <port protocol="udp" port="32413"></port>
  <port protocol="udp" port="32414"></port>
  <port protocol="tcp" port="32469"></port>
</service>
Save changes using the following key combination Ctrl + O and exit the editor using Ctrl + X.
Now we are going to add the plexmediaserver service to the Firewalld services and reload the configuration by executing the following:
sudo firewall-cmd --add-service=plexmediaserver --permanent
sudo firewall-cmd --reload
To verify that it has been added correctly, we execute the following line. We can check the “services” line for the Plex service.
firewall-cmd --list-all
Step 3: Configure Plex Media Server for Plex
The next step is to go to Plex and there create our account, you can login with Facebook, Google or email:
Once the account is created, we will access Plex from the browser using the CentOS IP address like this:
http://192.168.0.9:32400/web/
We must replace the IP address with the correct one on each server. At the time of access, we will see the following:

Click on “Sign In” to access Plex and follow the steps to configure your PLEX Media Server.